在vue中使用自定义指令
Contents
自定义指令
类似于vue中的v-if,v-show,我们也可以自己注册自定义指令,使用directive或者directives注册的指令为自定义指令,自定义指令分为两种,分别是全局自定义指令和局部自定义指令.通过自定义指令我们可以对dom进行底层操作.
自定义指令参数介绍
钩子函数介绍
bind
只调用一次,指令第一次绑定到元素时调用,在这里可进行一次性的初始化设置
inserted
被绑定元素插入父节点调用(保证父节点存在,但不一定被插入到文档中)
update
所有组件的VNode更新时调用,但是可能发生在其子VNode更新之前.指令的值可能发生改变,也可能没有
componentUpdated
指令所在组件的VNode及其子VNode全部更新后调用.
unbind
只调用一次,指令与元素解绑时调用
钩子函数参数
- el:指令绑定到的元素。这可用于直接操作 DOM
- bindings:
- instance:使用指令的组件实例。
- value:传递给指令的值。例如,在 v-my-directive=“1 + 1” 中,该值为 2。
- oldValue:先前的值,仅在 beforeUpdate 和 updated 中可用。无论值是否有更改都可用。
- arg:传递给指令的参数(如果有的话)。例如在 v-my-directive:foo 中,arg 为 “foo”。
- modifiers:包含修饰符(如果有的话) 的对象。例如在 v-my-directive.foo.bar 中,修饰符对象为 {foo: true,bar: true}。
- dir:一个对象,在注册指令时作为参数传递。例如,在以下指令中
vnode:一个真实 DOM 元素的蓝图,对应上面收到的 el 参数
prvenode:上一个虚拟节点,仅在 beforeUpdate 和 updated 钩子中可用。
注意:除了 el 之外,你应该将这些参数视为只读,并且永远不要修改它们。如果你需要跨钩子共享信息,建议通过元素的自定义数据属性集进行共享。
自定义指令分类
全局指令
全局指令只能使用directive单个创建
// main.js
directive('example', {
  // 钩子函数
  bind() {},
  inserted() {},
  updated() {},
  componentUpdated(){},
  unbind(){}
})
局部指令
局部指令使用directives来定义,directives在script内和data,methdos同级,内部可定义多个指令
<script>
    data(){return{}},
    methods:{},
    directives:{
    	directiveName1:{
        	// 钩子函数
    	},
    	directiveName2:{
        	// 钩子函数
    	},
   		directiveName3:{
        	// 钩子函数
    	},
	}
</script>
下方代码使用directives定义了一个resize指令,作用是在浏览器窗口更改时,更改div的大小
<template>
   <div v-resize>
      <h2>窗口宽度:{{innerWidth}}</h2>
      <h2>窗口高度:{{innerHeight}}</h2>
   </div>
</template>

<script>
export default {
  name: "App",
  data() {
    return {
      innerWidth:window.innerWidth,
      innerHeight:window.innerHeight,
    }
  },
  directives: {
    resize:{
      bind(){
        console.log('bind');
      },
      inserted(el,binding,vnode){
        console.log('inserted');
        const sizeChange=function (){
          this.innerWidth=window.innerWidth;
          this.innerHeight=window.innerHeight;
          el.style.width=this.innerWidth*0.7+'px';
        }
        window.addEventListener('resize',sizeChange.bind(vnode.context))
      },
      updated() {
        console.log('updated');
      },
      componentUpdated(){
        console.log('compontentUpdated');
      },
      unbind(){
        console.log('unbind');
      }
    }
  },
};
</script>
自定义指令简写
Vue.directive('example', function(el, binding){})
这里的 function 等同于将代码写在了 bind 和 update 钩子函数中。
自定义指令示例
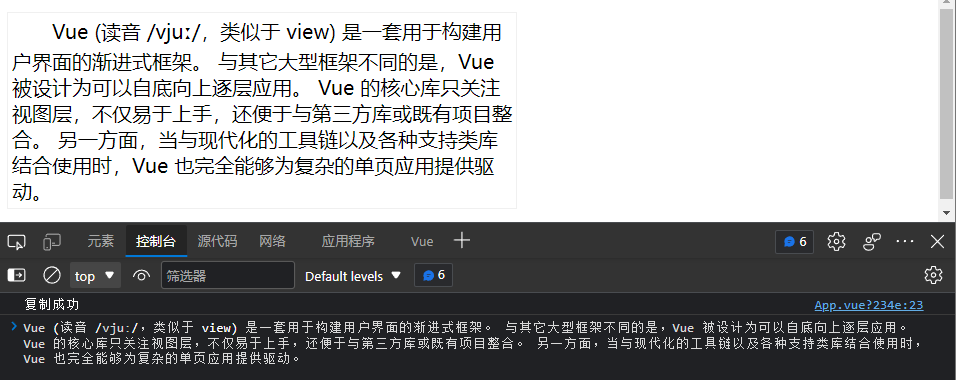
复制指令,点击元素节点复制内容

<template>
  <p v-copy>
    Vue (读音 /vjuː/,类似于 view) 是一套用于构建用户界面的渐进式框架。
    与其它大型框架不同的是,Vue 被设计为可以自底向上逐层应用。 Vue
    的核心库只关注视图层,不仅易于上手,还便于与第三方库或既有项目整合。
    另一方面,当与现代化的工具链以及各种支持类库结合使用时,Vue
    也完全能够为复杂的单页应用提供驱动。
  </p>
</template>
<script>
export default {
  directives: {
    copy: function (el) {
      el.addEventListener("click", () => {
        let textareaCopy = document.createElement("textarea");
        textareaCopy.setAttribute("readonly", "readonly");
        textareaCopy.style.opacity = 0;
        textareaCopy.value = el.innerText;
        document.body.appendChild(textareaCopy);
        textareaCopy.select();
        let copyText = document.execCommand("copy");
        document.body.removeChild(textareaCopy);
        console.log("复制成功");
        return copyText;
      });
    },
  },
};
</script>

<style>
p {
  width: 400px;
  text-indent: 32px;
  text-align: left;
  border: 1px solid #f0f0f0;
  padding: 3px;
  cursor: pointer;
}
</style>
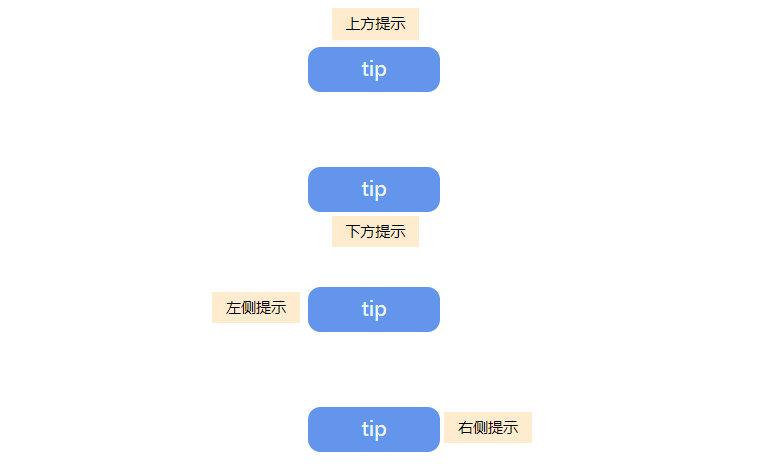
实现简单弹窗指令

<template>
  <div>
    <span class="tip" v-tip:[tipSite1]="tipValue1">tip</span>
    <span class="tip" v-tip:[tipSite2]="tipValue2">tip</span>
    <span class="tip" v-tip:[tipSite3]="tipValue3">tip</span>
    <span class="tip" v-tip:[tipSite4]="tipValue4">tip</span>
  </div>
</template>

<script>
export default {
  data() {
    return {
      tipSite1: "top",
      tipValue1: "上方提示",
      tipSite2: "bottom",
      tipValue2: "下方提示",
      tipSite3: "left",
      tipValue3: "左侧提示",
      tipSite4: "right",
      tipValue4: "右侧提示",
    };
  },
  directives: {
    tip: function (el, binding) {
      console.log(binding);
      const createTip = () => {
        let tipWindow = document.createElement("p");
        tipWindow.className = "tipWindow";
        switch (binding.arg) {
          case "top":
            tipWindow.style.top = "-85%";
            tipWindow.style.left = "18%";
            break;
          case "bottom":
            tipWindow.style.top = "110%";
            tipWindow.style.left = "18%";
            break;
          case "left":
            tipWindow.style.top = "12%";
            tipWindow.style.left = "-72%";
            break;
          case "right":
            tipWindow.style.top = "12%";
            tipWindow.style.left = "103%";
            break;
          default:
            tipWindow.style.top = "-90%";
            tipWindow.style.left = "18%";
            break;
        }
        tipWindow.innerText = binding.value;
        el.appendChild(tipWindow);
        setTimeout(() => {
          el.removeChild(tipWindow);
        }, 3000);
      };
      el.addEventListener("click", createTip);
    },
  },
};
</script>

<style>
div {
  display: flex;
  justify-content: center;
  align-items: center;
  flex-direction: column;
}
.tip {
  position: relative;
  background-color: cornflowerblue;
  border-radius: 10px;
  width: 100px;
  height: 30px;
  padding: 3px;
  text-align: center;
  line-height: 30px;
  color: aliceblue;
  cursor: pointer;
  margin: 30px 0;
}
.tipWindow {
  position: absolute;
  width: 70px;
  height: 25px;
  background-color: blanchedalmond;
  display: block;
  margin: 0;
  padding: 0;
  text-align: center;
  text-indent: 0;
  font-size: 8px;
  color: black;
  line-height: 25px;
}
</style>
